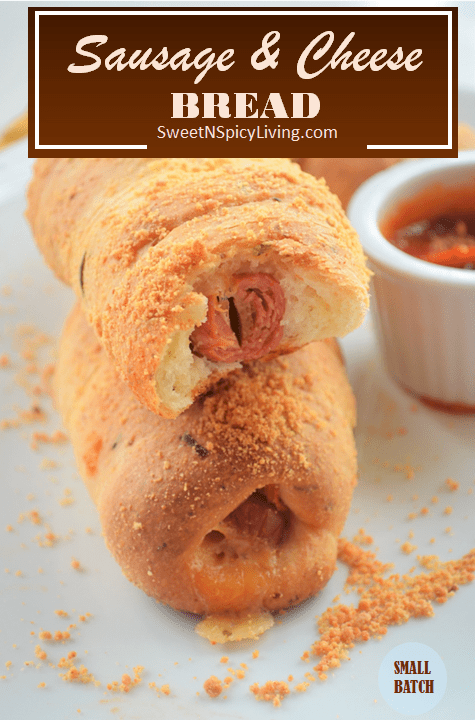
This Sausage & Cheese Bread are delightfully delicious and easy to make. You do not need any electric mixer to make this, that is a bonus in my world. This is a yeast bread so this will require yeast activation and resting period for the bread to develop flavor, texture and for it to rise. Just some basic step in yeast bread making. This is a small batch of 3 pieces, which I personally develop for those who are leaving alone or with someone special and need few pieces of bread for themselves. The serving portion is definitely not family size. I like making this because I do not feel the pressure of having to finish an entire dozen of bread and eat it every day of the week. 3 pieces are a decent amount, for 1 -2 person sharing this. If however you need a larger batch, say 12 pieces, what you can do it adopt the idea and use a regular plain bread dough recipe. Any bread dough for dinner rolls will work just fine. You can check my video for All-Around Bread Dough recipe, I had used it several times for different variations and they came out great.
Freshly baked homemade bread is worth it, trust me. I’m serious, hear me out. I had been baking for more than 13 years now, and the last thing that I expect is for me to fall in love in making homemade bread. I used to be scared of homemade yeast bread, just the thought of it made me shy away from making bread. But you know, we all fear what we don’t know. When I started learning how to make homemade bread, little by little I find myself drawn to it more than I expected. In fact, if I am to choose one category that I would love to focus on, that would be homemade bread. I’ve done quite a lot of bread variations using lean dough and rich dough and I love both of them. Lean dough is low in sugar and fat, the likes of French and Italian bread, pizza dough, baguette or no knead artisan bread. Other times I make bread using rich dough. Rich dough are bread that are higher in fat and sugar and often times contain eggs and milk. Because they are richer, they have a softer crust or texture (the likes of cinnamon rolls, dinner rolls, hot cross buns, etc.).

This Sausage & Cheese Bread uses a rich dough, more fat, more flavor. I used butter and cheese to give it not only soft texture but a rich delicious tasting bread. This maybe a small batch of 3, but this is definitely big in flavor and taste. I wouldn’t blame you if you would want for a bigger batch. I love bread making so much that I don’t mind making small batch of 3 breads, it is always worth it. Plus, since homemade bread do not use any preservatives, making a small batch that you can consume quickly is often a better idea than making a big batch and having it sit around to be eaten. Homemade bread tends to have shorter shelf life and it is always best to serve it the day it was made, even more fresh hot from the oven.

About This Recipe
- Ease in Making the Recipe: This is a yeast bread, which means this will require more time to make. Most of the time will be spent in the rest period, and few minutes in kneading it. I would say about 2 1/2 hrs. I know it sounds crazy to make 3 pieces of Hotdog Bread for 2 1/2 hrs, but I personally find it worth it. I do something else while waiting for the dough to rise and so I do not feel that I am wasting anytime. The bread dough is pretty basic, you can even use any of your favorite bread dough or even ready to use crescent dough. Because we are wrapping the sausage with the bread dough, there is an extra step, nothing complicated. In fact, I had fun making this bread. Wrapping the sausage and rolling it in parmesan cheese is kind of relaxing to me.
- Ingredients: This uses simple bread dough ingredients. Flour, butter, salt, yeast, sugar, water. The filling is a sausage and cheese which are pretty easy to find. Overall, you will not have difficulty finding ingredients for this recipe, unless panpdemic happens again and we go back to shortage of basic baking ingredients. I hope not 🙂
- Texture, Taste & Flavor: The texture of the bread is really soft. If you look closely, you will see how the dough is almost layered, not compact, not dense. Use a good quality sausage and cheese to achieve better flavor. I used sharp cheddar marble cheese and a spicy sausage. I would not recommend using mozzarella cheese as it could make the bread soggy and quite messy. It will still taste great, which in the end is what is important. You do you 🙂
- Make-Ahead: Definitely, but this is a 3 pieces bread. I wouldn’t expect any leftover, so I recommend making it the same day. Freshly bake bread is always better.
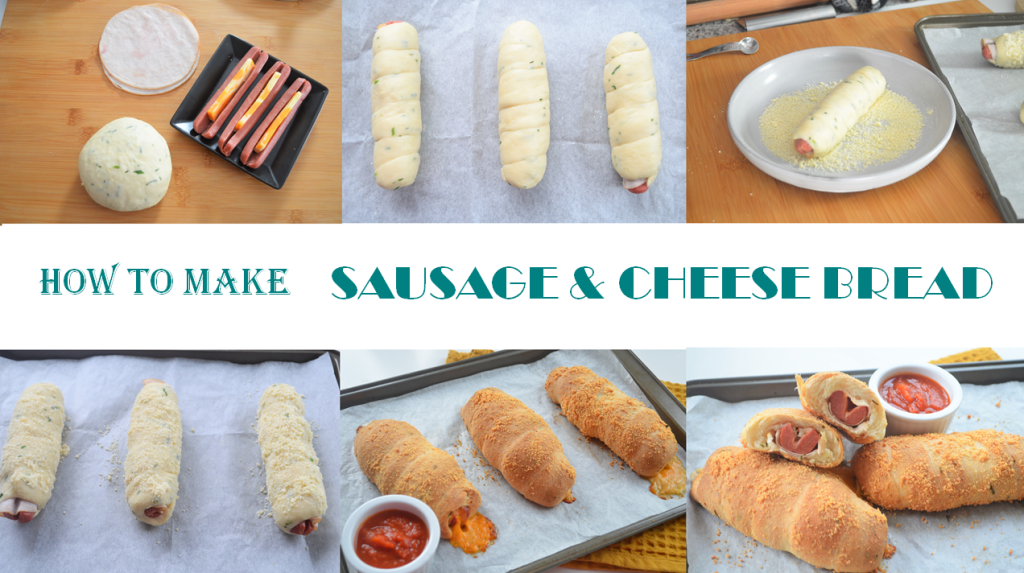
How to Make Sausage and Cheese Bread
This is a small batch recipe for two. You might be asking why go through the hassle of making a bread that only serves two. Well because it’s worth it 🙂 plus for me it is really satisfying being able to make my own bread from scratch. That’s just me. The perk is you get fresh bread every time you want one and there is no need to rush out to get one because you can make it from home, and there’s no left over to worry about. Here is a quick summary on what you can expect to do to make this bread. The details are in the instructions section.
- Activate the Yeast – 10 minutes
- Make the Bread Dough – 10 minutes
- First Rest Period – 30 minutes
- Shape the Dough – 15 minutes
- Second Rest Period – 45 – 60 minutes
- Bake – 15 minutes
- Cool – 8 minutes

Tips for Successful Soft Homemade Bread
- Liquid Temperature – Yeast grows in temperature between 105 – 110F, so its important to have the water that you are using to “proof” it in this range. If you go lower or higher, the yeast might not proof properly. That means the bread will not rise as much, resulting to a flat and tough bread.
- Check Yeast Expiry a Date – you might be wondering how come the bread did not rise when you followed exactly the recipe. Well, first thing first, make sure the yeast is not yet expired. Expired yeast is the common reason for flat and dense bread. If your bread did not expand or rise during the rest period, it is most likely that the yeast is not fresh or the water temperature is too hot or cold.
- Amount of Yeast – Just because you want a tall bread doesn’t mean you have to put as much yeast in the mixture. Sometimes adding too much yeast can cause the bread to collapse during the rest period. Just imagine putting more air than what is needed in a balloon, the balloon will explode. The same case with bread.
- Right Type of Yeast – Make sure to use the right one for your recipe, and make necessary adjustments if you want to swap one from another. Active dry yeast requires activation. If you want to swap active dry yeast to instant yeast, reduce the measurement by 1/4 teaspoon. Instant yeast are finer and stronger so you will need less and it will not require activation. You can immediately mix it with the dry ingredients just make sure to avoid direct contact with salt as salt can kill it.
- Rest Period – Yeast bread needs time to rise. There are bread that uses less yeast but requires more rest time, the likes of No Knead Bread or Artisan Bread which usually require 8- 16 hours rest period to get the volume and to develop the flavor. There are 1 hour bread like my Rosemary Dinner Rolls which used this same bread dough. The point is, give it time to rest, don’t touch it just leave it in a warm place. The first rest period will normally tell you if your dough is good or not. If it rise and almost double in size, then your on the right track.
- Expiration and Quality of the Flour – The quality of the flour greatly affect the texture of the bread. All-purpose flour could differ from country to country although they are all called as all-purpose flour. Sometimes it depends on the brand too. The closer the flour to expiration date or if it is already expired, the flour could tend to be drier, which means it would require more liquid than mentioned in the recipe. This is a common issue of way sometimes the dough tend to be tough and dry. This is why sometimes you have to add few more tablespoon from the suggested flour measurement to get the right texture. The dough should be soft, smooth and elastic. If it is too wet, add a bit more flour until it is no longer to sticky to handle. If it is too dry, a small amount of liquid helps provide moisture to the dough. A clean side of the bowl, with the dough slightly sticking at the bottom, a soft, smooth and elastic dough is what You are aiming for.

How do I Know if I Made the Bread Dough Correctly?
- Activating the Yeast – This is the first thing that you should get right, otherwise do NOT proceed. After 5 – 10 minutes you should see a foam forms on top of the water, this is an indication that the yeast is alive. If you do not get this, either the yeast is old or the liquid temperature is too hot or cold. The temperature should be 100F, lukewarm but not hot.
- Clean Bowl After Kneading – The sides of the bowl should be clean, while the bottom is slightly sticking to the dough. This means that amount of liquid to the flour is correct. Enough to make a clean bowl and still make a slightly wet dough.
- Soft Dough – Soft dough means the amount of flour to liquid is enough. Too much flour could make the bread dense and heavy, and too much liquid could make it too wet. Both will affect how the bread rise in the rest period. Try to push your fingers in the dough, it should leave a “dimple” on the dough and should gradually disappear.
- Smooth Dough Surface – Again, this is a sign of correct flour to liquid ratio. A “bumpy” surface could mean that the dough is dry and tough.
- Elastic Dough – A soft dough is usually elastic. If your dough is dry and tough, it wouldn’t be as elastic when you pull it apart.
- First Rest Period – The dough should almost double in size. This is a sign that the activation of the yeast work which is crucial to making a soft and fluffy bread. This also means the yeast is alive (not yet expired) and the liquid temperature is correct. I always use baking thermometer to check the temperature of the liquid.
- Second Rest Period – The bread dough should be really puff up. This is crucial and the final state of the bread before baking. If you are able to make it puff-up, that is a good sign that there are air trapped inside which will make the bread fluffy.

Why is My Dough too Wet or too Dry?
Don’t get frustrated if your dough did not turn out immediately as what you see in the photo or video. Most likely It is not because you did not follow the recipe. When it comes to bread making, the amount of flour and liquid is not always 100% precise. This is why often times you will encounter recipes that says, if your dough is dry, add a bit more liquid. If your dough is too wet, add a little bit more flour. This instructions are not meant to confuse you, they are meant to guide you on how to adjust as you work through your dough. The reason for this is that although the measurement of water and flour are specified in the recipe, it still could slightly vary depending on many factors. For instance, all-purpose flour could very from country to country, or even from brand to brand. Don’t be surprise if you find that some brand tends to require a bit more liquid as the others. On top of this, the amount of liquid is also affected by the state of your flour. How old is the flour that you are using? Older flour nearing expiry tends to be drier and this requires more liquid. Humidity also affects baking. The more humid it is, the more likely the dough will be sticky and wet. Bread making requires patience, and practice. Once you learn how to feel the right texture of the dough, everything will be quick and easy. You can instantly tell if you need to add more water or flour to get the dough in right state.

Variation
I’ve used this recipe before when I made a plain Parmesan Buns for Two. If you are looking for a plain version that you can use as sandwich bread, check out that post. I have the link at the featured posts section or simply click HERE. The buns looks like this. You can use it as a sandwich bread or for any meal that requires a bread like soup, salad, pasta or stew.

Ingredients:
Yeast Mixture
- 1/4 cup Milk (110F) (tap water microwaved for 20 seconds)
- 1/2 teaspoon Active Dry Yeast
- 1/2 teaspoon granulated White Sugar
Flour Mixture
- 2 tablespoon unsalted Butter – slightly melted (microwaved 30 seconds)
- 3/4 cup Bread Flour
- 2 teaspoon granulated Sugar
- 1/4 teaspoon table Salt
- 1 teaspoon chopped fresh Chives or Green Onion (optional)
- 1/4 cup powdered Parmesan Cheese
Topping & Filling:
- 3 Sausages
- 3 Cheese Sticks
- 3 Ham
- 1/4 cup Parmesan Cheese Powder
- 1/8 teaspoon Garlic Powder
Instructions:
- Activate the Yeast: Pour the warm water, sugar and yeast in a bowl. Let sit for 10 minutes or until bubbly.
- Wet + Dry Ingredients: Add the slightly melted butter, bread flour, sugar, salt, and chives (or green onions) and mix just combine until the bowl is clean. Flour the working area and start manually kneading the dough, about 5 minutes until the dough is smooth, soft and elastic. Shape the dough into a ball shape.
- First Rest Period: Cover the dough with the bowl leave for 30 minutes in a warm place. If you have time, you can leave it as long as 1 hour or until double in size.
- Prepare the Sausage: Make a slit on top of the sausage, deep enough to insert the cheese stick in the middle. The cheese stick should be shorter than the sausage to avoid too much spillage of cheese when baked. Wrap the sausage with a ham (or bacon). Set aside.
- Portion and Shape the Dough: Divide the dough into 3 portions. Roll and form each portion into a 12-inch size. Wrap the sausage with the dough.
- Roll in Powdered Parmesan Cheese: In a separate bowl, mix parmesan cheese and garlic powder. You can also add other herbs and spices. Roll each wrapped sausage into the mixture. Arrange in a parchment line baking sheet, leave at least 2-inches apart.
- Second Rest Period: Cover and let sit for 45 – 60 minutes (or until puff up) in a warm place. The bread will puff-up and expand.
- Bake at 350F for 15 minutes. Check at 10 minutes rotate the pan or cover the top with aluminum foil if the top is browning fast.
- Cool transfer in a cooling rack and let cool at least 15 minutes before serving

Recipe Notes:
- Use a medium size sausage. The dough is just enough to wrap 3 medium size sausages. If you use a long and bigger sausage, make sure to extend the length of the dough so that it can fully wrap the sausage. For this sausage, I had it on 12-inch length, just enough to cover the entire sausage.
- Do not cut the sausage all the way through, just enough to insert a cheese in between.
- Cut the cheese smaller than length of the sausage to avoid too much spillage when the cheese melt.
- Feel free to use other herbs and spices to flavor the Parmesan cheese coating
Makes 3 pieces
Enjoy! If you make this, share and tag me in Instagram #SweetNSpicyLiving. I would like to see your creations too.
My Latest Video
- [VIDEO] Small Batch Dinner Rolls for Two (Makes 4)
- [VIDEO] Jalapeno and Cheese Pull-Apart Bread
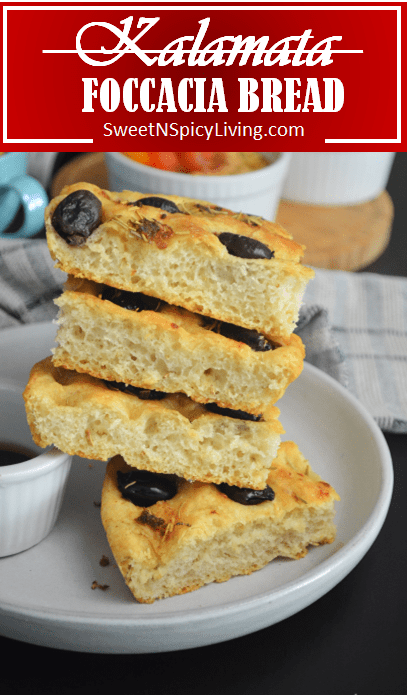
- [VIDEO] Kalamata Foccacia Bread
- Braided Sesame White Loaf Bread
- [VIDEO] Herbed Pull-Apart Jalapeno and Cream Cheese
- Basic White Bread
- Soft Garlic Bread
- [VIDEO] Brioche Hamburger Buns
- Vegan Dinner Rolls
- [VIDE] Filipino Ensaymada
- Garlic Bread Stick
- [VIDEO] 10 Homemade Bread Recipe Videos


Thank You for visiting my website. Please don’t forget to click the “Like” button below if you like this recipe. Lastly, did you know that I have a YouTube Channel? Please support my channel by clicking on the “Subscribe” button in my video and the “Bell” icon to get notification of new videos.

FOLLOW SWEETNSPICYLIVING ON SOCIAL MEDIA
Facebook | Instagram | Pinterest | Twitter | YouTube
Share this:

Categories: Baking, Bread, Recipe, Small Batch Recipes, Video, Video Recipes

This dough looks so flaky and delicious! My mind is thinking of so many things to stuff it with!
LikeLiked by 2 people
even plain mozzarella cheese with jalapeno peppers will be great inside 🙂
LikeLiked by 1 person