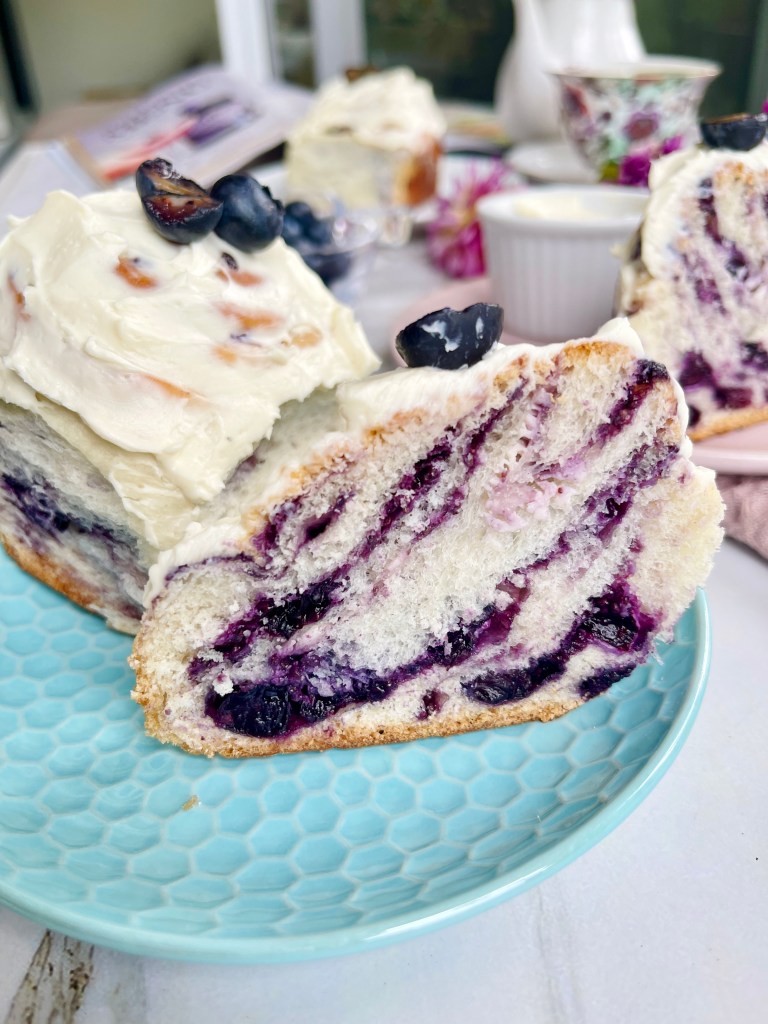
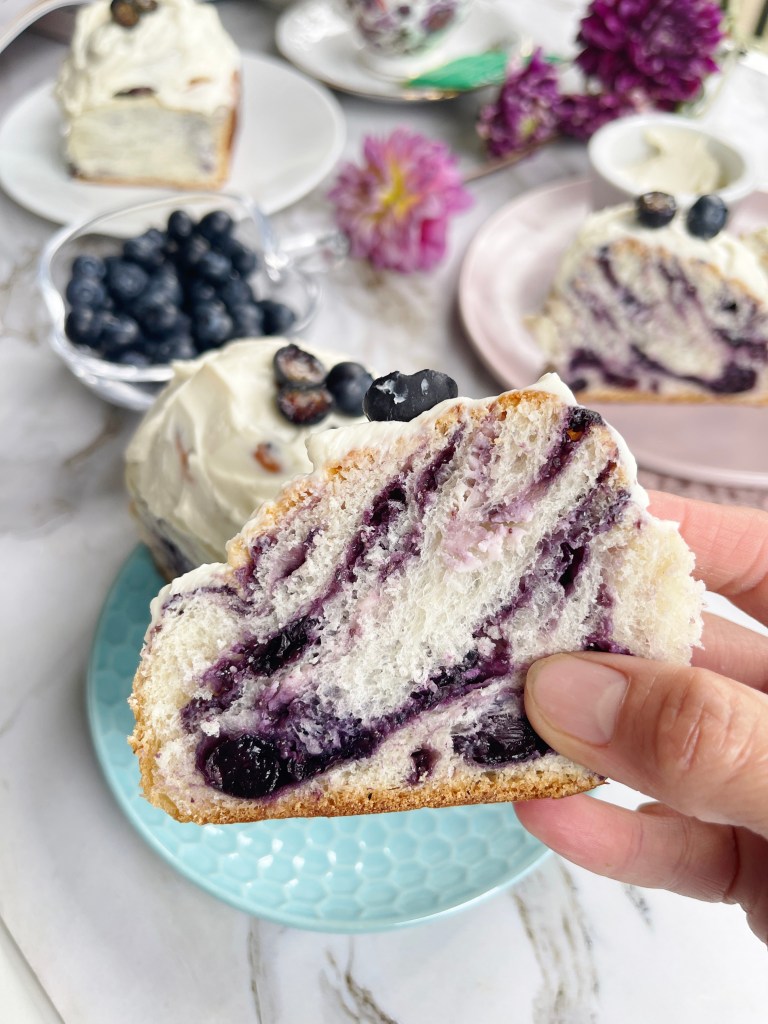
I finally had the chance to make this Blueberry Cream Cheese Roll. I had this in my to do list almost every Summer but never got the chance to make it.
Summer in Vancouver is short and even more when you are having fun with the warm weather. I’ve made a lot of bread both sweet and savory and it is really difficult for me to say which one is my favorite, although if think of it, I have a lot of savory bread more than the sweet one. Jalapeño and Cheese or anything with cheese are my favorite savory bread to make.

When it comes to sweet bread or roll, I will go with chocolate or custard rolls. For Summer, berries, Mango and Peach top the list of my favorite things to bake.
This maybe as a shock if I say I am not a fan of cinnamon roll, they taste good but I find it too sweet for my taste. I guess it’s the sugar frosting on top that overwhelmed me. Although I am not a huge fan of it, I will eat it when you give it to me.

Through the years, I’ve come to learn to create my own variation of something that I don’t like. Think of it as customizing something to your liking. You f I think of it that way, I like the idea of cinnamon roll.
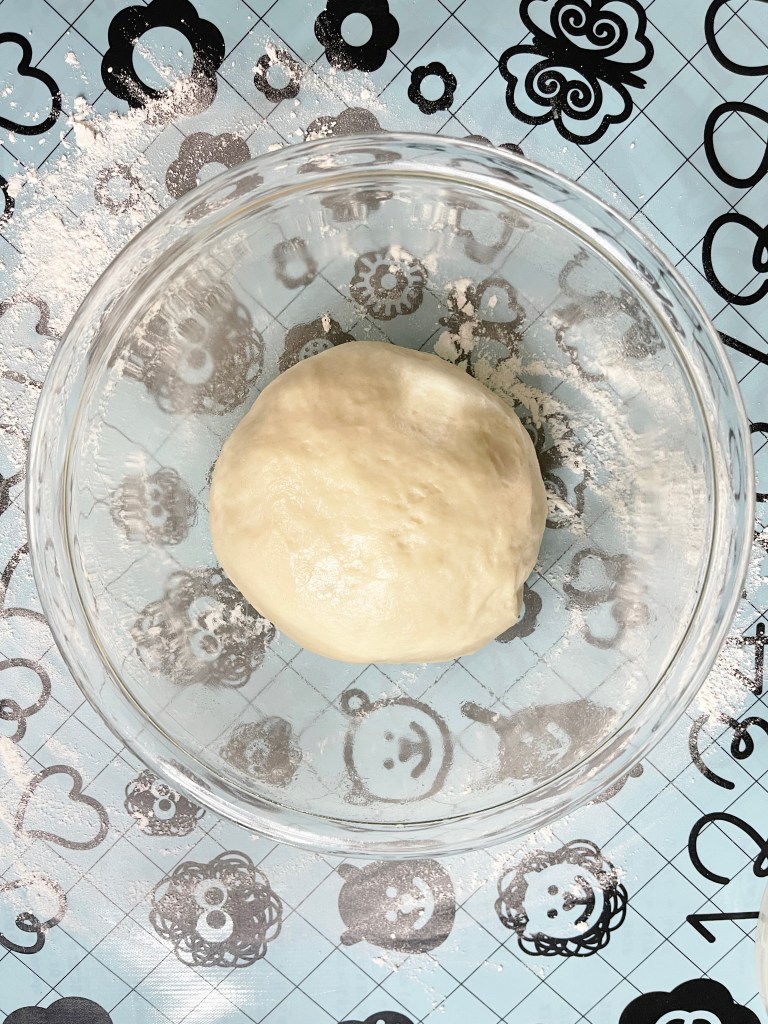
This Blueberry Cream Cheese Roll was inspired by the idea of Cinnamon Roll. I scaled down the dough recipe to only make 4 pieces. I want to keep the bread dough really simple and basic, so I experimented on keeping it plain. No egg, no butter.
A lot of my basic bread dough uses butter, small amount added at the end of kneading. However, I noticed for bread rolls like this, a bread dough without butter is much better and softer. So instead, I used oil to make the bread soft and fluffy. Because it doesn’t harden and solidify like butter, the bread stays softer longer even when refrigerated. I’m not saying that this roll lasted long though, I think I finished this in 2 days, which is not bad. Gone, just like that.

I also tested it using milk and using water and both turned out great. I like recipe like this because you can make it with just the basic ingredients. This is a perfect serving portion for 2, or 1 if you don’t want to share. It was definitely the perfect portion for me. This bread dough had been my favorite dough to make almost every week when I need a bread just for myself. If you are looking for a large batch, I have one in my website, checkout this Vegan Rolls.
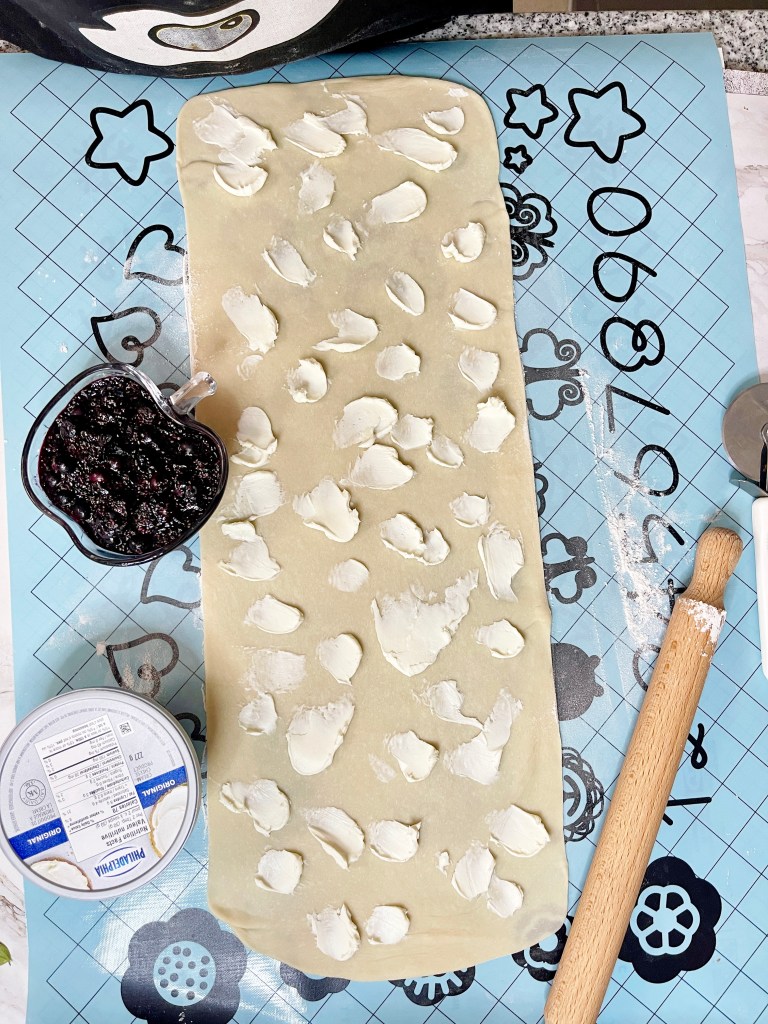
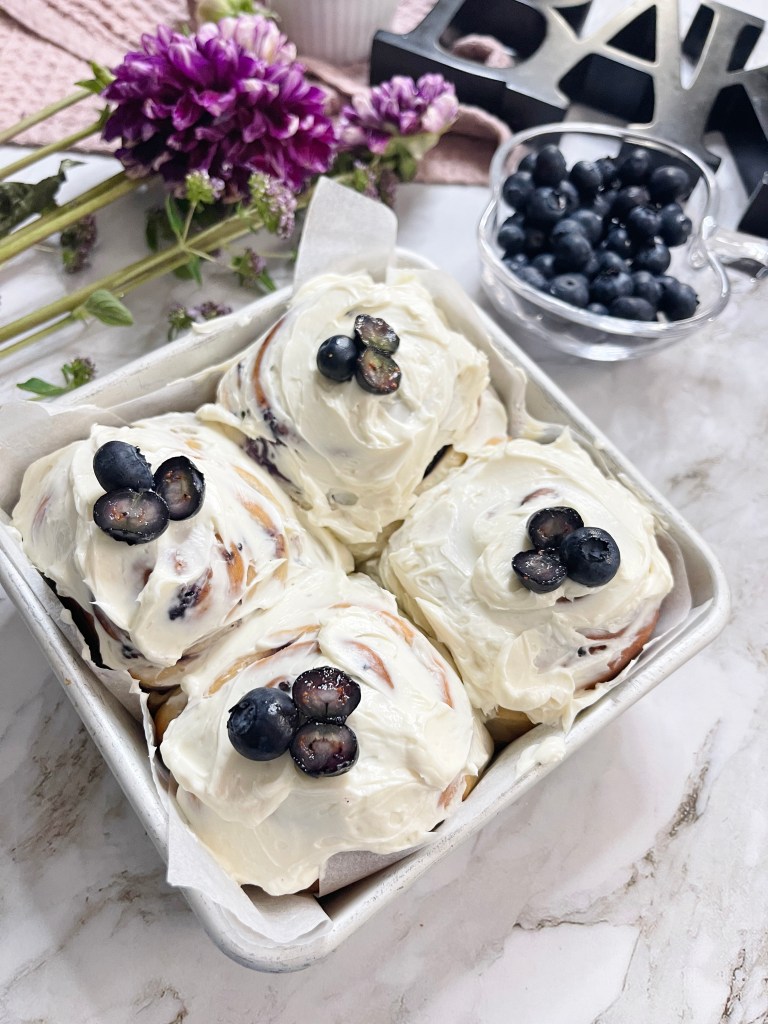
Instead of cinnamon sugar, I filled the bread with cream cheese for a creamy tangy taste to balance the sweetness of the blueberry filling.

For the blueberry filling, I used fresh Blueberry because it was in season. Frozen blueberry will work too, it will just need additional time to cook to defrost it. When I made this filling, I run out of cornstarch which is what I usually use to thicken the filling. I was really lazy to go out to buy cornstarch so instead I used chia seed. I’ve used chia seed before when I made jam and it turned out great. Give it a try if you happen to have some, if not, then use cornstarch.
For the frosting, instead of icing sugar glaze, cream cheese frosting is my favorite for roll like this. a simple whipped cream cheese with a bit of icing sugar, vanilla extract and a pinch of salt. If I prefer it to be thinner which sometimes I do, I add a small amount of milk to make the consistency thinner.

Tips for a Successful Soft Homemade Bread
- Liquid Temperature – Yeast grows in temperature between 105 – 110F, so its important to have the water that you are using to “proof” it in this range. If you go lower or higher, the yeast will not proof properly. That means the bread will not rise as much, resulting in a flat and tough bread.
- Check Yeast Expiry a Date – you might be wondering how come the bread did not rise when you followed exactly the recipe. Well, first thing first, make sure the yeast is not yet expired. Expired yeast is the common reason for flat and dense bread. If your bread did not expand or rise during the rest period, it is most likely that the yeast is not fresh or the water temperature is too hot or cold.
- Amount of Yeast – Just because you want a tall bread doesn’t mean you have to put as much yeast in the mixture. Sometimes adding too much yeast can cause the bread to collapse during the rest period. Just imagine putting more air than what is needed in a balloon, the balloon will explode. The same case with bread.
- Right Type of Yeast – We’ve discussed the 3 types of yeast above. Make sure to use the right one for your recipe, and make necessary adjustments if you want to swap one from another.
- Rest Period – Yeast bread needs time to rise. There are bread that uses less yeast but requires more rest time, the likes of No Knead Bread or Artisan Bread which usually require 8- 16 hours rest period to get the volume and to develop the flavor. There are 1 hour bread like my Rosemary Dinner Rolls which used this same bread dough. The point is, give it time to rest, don’t touch it just leave it in a warm place. The first rest period will normally tell you if your dough is good or not. If it rise and almost double in size, then your on the right track.
- Expiration and Quality of the Flour – The quality of the flour greatly affect the texture of the bread. All-purpose flour could differ from country to country although they are all called as all-purpose flour. Sometimes it depends on the brand too. The closer the flour to expiration date or if it is already expired, the flour could tend to be drier, which means it would require more liquid than mentioned in the recipe. This is a common issue of way sometimes the dough tend to be tough and dry. This is why sometimes you have to add few more tablespoon from the suggested flour measurement to get the right texture. The dough should be soft, smooth and elastic. If it is too wet, add a bit more flour until it is no longer to sticky to handle. If it is too dry, a small amount of liquid helps provide moisture to the dough. A clean side of the bowl, with the dough slightly sticking at the bottom, a soft, smooth and elastic dough is what You are aiming for.

How do I Know if I Made the Bread Dough Correctly?
- Activating the Yeast – This is the first thing that you should get right, otherwise do NOT proceed. After 5 – 10 minutes you should see a foam forms on top of the water, this is an indication that the yeast is alive. If you do not get this, either the yeast is old or the liquid temperature is too hot or cold. The temperature should be 100F, lukewarm but not hot.
- Clean Bowl After Kneading – The sides of the bowl should be clean, while the bottom is slightly sticking to the dough. This means that amount of liquid to the flour is correct. Enough to make a clean bowl and still make a slightly wet dough.
- Soft Dough – Soft dough means the amount of flour to liquid is enough. Too much flour could make the bread dense and heavy, and too much liquid could make it too wet. Both will affect how the bread rise in the rest period. Try to push your fingers in the dough, it should leave a “dimple” on the dough and should gradually disappear.
- Smooth Dough Surface – Again, this is a sign of correct flour to liquid ratio. A “bumpy” surface could mean that the dough is dry and tough.
- Elastic Dough – A soft dough is usually elastic. If your dough is dry and tough, it wouldn’t be as elastic when you pull it apart.
- First Rest Period – The dough should almost double in size. This is a sign that the activation of the yeast work which is crucial to making a soft and fluffy bread. This also means the yeast is alive (not yet expired) and the liquid temperature is correct. I always use baking thermometer to check the temperature of the liquid.
- Second Rest Period – The bread dough should be really puff up. This is crucial and the final state of the bread before baking. If you are able to make it puff-up, that is a good sign that there are air trapped inside which will make the bread fluffy.

Why is My Dough too Wet or too Dry?
Don’t get frustrated if your dough did not turn out immediately as what you see in the photo or video. Most likely It is not because you did not follow the recipe. When it comes to bread making, the amount of flour and liquid is not always 100% precise. This is why often times you will encounter recipes that says, if your dough is dry, add a bit more liquid. If your dough is too wet, add a little bit more flour. This instructions are not meant to confuse you, they are meant to guide you on how to adjust as you work through your dough. The reason for this is that although the measurement of water and flour are specified in the recipe, it still could slightly vary depending on many factors. For instance, all-purpose flour could very from country to country, or even from brand to brand. Don’t be surprise if you find that some brand tends to require a bit more liquid as the others. On top of this, the amount of liquid is also affected by the state of your flour. How old is the flour that you are using? Older flour nearing expiry tends to be drier and this requires more liquid. Humidity also affects baking. The more humid it is, the more likely the dough will be sticky and wet. Bread making requires patience, and practice. Once you learn how to feel the right texture of the dough, everything will be quick and easy. You can instantly tell if you need to add more water or flour to get the dough in right state.
How to Make Blueberry Roll:


Blueberry Filling Ingredients:
- 1 cup fresh or Frozen Blueberry
- 3 tablespoons granulated Sugar
- 1 tablespoons Chia Seed or cornstarch
- 1/4 cup Cream Cheese – cut into cube
Dough
- 1/4 cup Milk or Water (warm to 110F)
- 3 tablespoons granulated Sugar
- 1/3 tablespoons Salt
- 1 cup Bread Flour or All-Purpose Flour
- 2 tablespoons Flavorless Oil
Cream Cheese Frosting
- 3 tablespoons Cream Cheese
- 2 tablespoons Icing Sugar
- Pinch table Salt
- 1/2 teaspoon Pure Vanilla Extract
Instructions:
- Make the Blueberry Filling: In a pan, cook 3/4 cup of Blueberries and 3 tablespoons granulated sugar until the Blueberries juice comes out. Occasionally stir to avoid sticking. Add 1/4 cup Blueberry and chia seed jam and cook for another 3 minutes. Transfer in a bowl and let cool completely. Refrigerate while you make the dough.
- Activate the Yeast: Pour the milker water is the mixing bowl. Add 1/2 teaspoon sugar and stir. Add active dry yeast, stir and leave for 10 minutes to bloom. Add oil.
- If using instant yeast, mix the yeast with the dry ingredients. No need to activate it.
- Add Dry Ingredients: Add the flour, salt and remaining sugar. Knead for 15 minutes. Continue mixing until the dough comes together completely, the side of the bowl is clean and the dough slightly sticking at the bottom of the pan. Do not stop mixing until you get to this stage. It takes time to fully incorporate the butter to the flour mixture, be patient.
- Let Rest 1st Time: Transfer in a greased bowl. Cover and let rest for 60 minutes in a warm place.
- Trick: Pre-heat the oven to 110F then turn it OFF. Put the covered dough inside for 15 minutes.
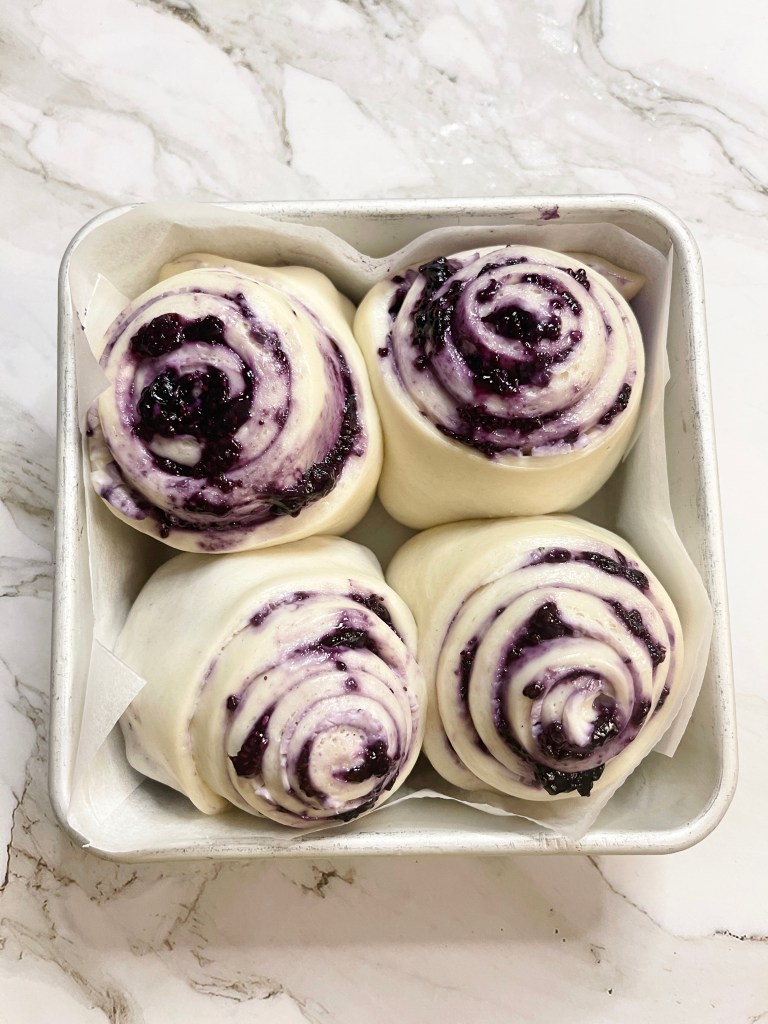
- Roll, Fill, Shape: Roll the dough o about 18 x 7-inches. Distribute the cubed cream cheese and spread the blueberry cream cheese filling on top.
- Cut: Divide the dough into 4 portion. Mark the portion and cut vertically. Roll each piece.
- Arrange in a 5-inch square pan lined with parchment paper.
- Let Rest 2nd Time: Place in a warm place to rise for 60 – 90 minutes. It will be puffy when ready, if needed extend until the bread is fully puff-up.
- Oven: Meanwhile, preheat the oven to 350F in the last 10 minutes of 2nd rest time. If you are using the oven to rest the dough, do NOT forget to take the dough out before pre-heating.
- Bake – Bake in the lower rack for 10 minutes. Transfer in the middle rack and continue baking for another 10 – 13 minutes. Cover then top with aluminum foil at 5 minutes time. Turn the tray half way though for even baking.
- Let Cool completely to allow the bread texture to get better. The bread must be completely cool if you are adding frosting on top. If you do not eat to add frosting, you can dust the top with icing sugar instead.
- Make the Cream Cheese Frosting: In a bowl, mix softened cream cheese, icing sugar, vanilla extract and pinch of salt. If you prefer a thinner frosting, add 1-2 teaspoon milk.
- Frost: Spread the frosting on top.
Makes 4 pieces

Enjoy! If you make this, share and tag me in Instagram #SweetNSpicyLiving. I would like to see your creations too.
Featured Posts:
- 1 Hour Rosemary Dinner Rolls
- White Bread Loaf
- Purple Yam Pull Apart Bread
- Small Batch Dinner Rolls for Two (Makes 4)
- [VIDEO] All Around Bread Dough: Nutella Star Bread (Plus Bonus Twist Bread)
- Small Batch Hot Cross Buns
- [VIDEO] All Around Bread Dough: Italian Herbed Jalapeño & Cream Cheese Pull Apart
- Small Batch Apple Cinnamon Roll (Makes 4)
- Vegan Dinner Rolls
- [Video] 10 Homemade Bread Recipe Videos


My Latest Video
Thank You for visiting my website. Please don’t forget to click the “Like” button below if you like this recipe. Lastly, did you know that I have a YouTube Channel? Please support my channel by clicking on the “Subscribe” button in my video and the “Bell” icon to get notification of new videos.

FOLLOW SWEETNSPICYLIVING ON SOCIAL MEDIA
Facebook | Instagram | Pinterest | Twitter | YouTube
Share this:

Categories: Baking, Bread, Recipe, Small Batch Recipes
